Configure application via printer panel
Configure NDD Print Access
1. After configuring access control on the device's web page, go to the equipment screen and click the “Login” button;
2. Click on the gear icon to access the settings;
3. Enter the password to access the settings (default password: 1111) and click the Login button;
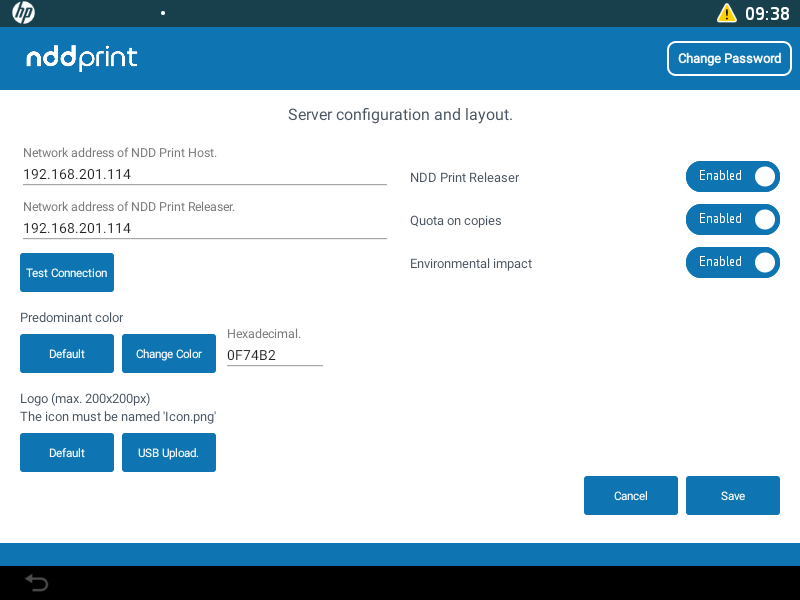
configuration example
4. Enter the data:
Network address of NDD Print Host : enter the server address where the NDD Print Host module is installed;
NDD Print Releaser: activates the secure document release functionality;
Network address of NDD Print Releaser: enter the server address where the NDD Print Releaser module is installed;
To use secure release of documents held on the server, keep NDD Print Releaser as Enabled. If not activated, the module will only act as an authentication control.
Quota on copies: allows limiting access to the printer's copy features;
Environmental impact: show the Environmental impact monthly statistics;
Main color: customize the color by clicking the Change Color button, or enter the hexadecimal code of the desired color. To return to the standard color, click Standard;
Logo: change the NDD Print application logo as follows:
Save the desired image file to a flash drive (FAT32 format) with the name Icon.png;
The image must have a maximum size of 200x200 pixels, if the image is smaller, its proportion will be maintained;
Insert the USB stick into the device's USB port and click the USB Upload button;
To return to the standard icon, click the Standard button.
5. After defining all fields, click the Save button. The application will validate the settings made. Then, the configuration screen will automatically close to apply the changes.
To configure the module installed on the equipment in a massive way, you must first configure a device manually, and then replicate these settings to the other devices through the HP Command Center.
Access hpcommandcenter.com/main;
Click the Accounts tab and select the account to which the equipment has been assigned;
In the Solutions list, go to NDD Print Client HP and click Manage;
Under Manage solution, click Configure;
Select the equipment that will have its configuration replicated and click Copy from device;
Select the device to be configured and click Next;
Select from the options Configure now or Schedule configuration and click Configure;
A module configuration task will be created on the equipment, click on Finish and wait a few moments until the process is finished.
To check if the configuration process was completed successfully, follow through the Task history.
Change access password
When accessing the configuration interface, click the Change Password button, enter the new ac-cess credentials and click the Save button to define them.