Configure the SQL Server database
In this article, you will learn how to create and configure the SQL Server database to use NDD Print MF Epson.
Before you start
This configuration is only for scenarios in which the installation or update of NDD Print MF Epson was carried out using the option “I have a SQL Server database and I want to use it”.
This setting must be made before adding new printers to NDD Print MF Epson.
It is recommended that you always use a unique database for NDD Print MF Epson.
Only administrator users can configure the database.
We recommend making a backup of the database.
Configuring database access
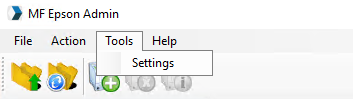
Open the NDD Print MF Epson interface
In the menu, click on Tools > Settings
Select SQL Server
Fill in the database information
If you use a user with database creation permission, NDD Print MF Epson will create the database and tables. If you don't have create permission, use the SQL script.
Click Apply > OK
Using an SQL script
If you prefer, you can use the SQL script to create the tables in the database.
You need a user with permission to create a database.
Go to the NDD Print MF Epson installation folder
Open the
CreateDatabaseSQLServer.sqlfile and copy its contentsIn pgAdmin, right-click on the created database
Click on New query
Paste the contents of the
CreateDatabaseSQLServer.sqlfile and click executeWhen finished, configure access to the database
Auto Close parameter
Change the Auto Close parameter to False in the database - SQL Server
In certain scenarios using SQL Server databases, the Auto Close parameter may be set to True, when it should ideally be set to False.
If this situation is identified in the environment, follow the steps below to make the change and ensure that the parameter remains set to False:
Option 1 — SSMS (SQL Management Studio)
Open SSMS and connect to the instance.
In Object Explorer, expand Databases.
Right-click on the desired database → Properties.
Go to Options.
Under Automatic, locate Auto Close and set it to False.
Click OK.
Refresh Object Explorer (F5).
Option 2 — T-SQL (a database)
Open SQL Server Management Studio (SSMS).
In Object Explorer, expand the instance where the database is located.
Right-click on the desired database and select New Query.
In the blank query window that opens, paste the script below, replacing YourDatabase with the name of the database:
SQLALTER DATABASE [SeuBanco] SET AUTO_CLOSE OFF;Click Execute or press F5.
To validate that the change has been applied, paste and execute the following command:
SQLSELECT name, is_auto_close_on FROM sys.databases WHERE name = N'SeuBanco'; -- is_auto_close_on = 0 indicates OFF (False)