Configurar NDD Print Client Collector
From version 5.11.0 of NDD Print Lexmark Client Collector onwards, communication will only take place via the HTTPS protocol, and it will no longer be possible to send data via the HTTP protocol.
After authenticating with administrative credentials on the printer web page, go to the applications page, find the NDD Print Client Collector Lexmark. The path may change depending on the printer and the framework, the most common being:
To configure the module on printers with LesF2x 4 lines |
|---|
|
To configure the module on printers with LesF2x and LesF3x framework |
|---|
|
To configure the module on printers with LesF4x framework |
|---|
|
To configure the module on printers with LesF5x or higher |
|---|
|
General collection settings and server upload
Send time (hours): Enter the interval in hours that you want the accounting files, counters, supplies and events (NPL, NSL and NPA) to be sent to the configured server(s);
Default domain: domain to which all jobs captured by the printer will be assigned (when it does not obtain automatically);
Multiple domains: in environments that have more than one domain, enable this field so that jobs from different domains are counted for the specified domains.
It is necessary to use a specific print driver that collects the UPN (User Principal Name) provided by the manufacturer.
domain_name_1=domain.example.local;domain_name_2=example_1.com,example_2.com
Result: domain.example.local will be assigned to "domain_name_1" and both the other (example_1.com and example_2.com) to "domain_name_2".
Delimiters: after activating this functionality, it will be necessary to configure the characters that will delimit from which part of the document title the user's login will be captured.
Delimiters can be configured as follows:
“Initial and Final Delimiter” or “Only a Initial Delimiter”
“Only a Final Delimiter”.
The documents that will be sent to the print queue must have the structure as shown in the example below. In this case, initial and final delimiters were used:
@@john@@document_title.txt
In this example the user will be detected as john and the document name will be document_title.txt.
Functionality available only for devices LesF4x, LesF5x e LesF6x.
SNMP community: Configuration versions 1/2 and 3 of the Simple Network Management Protocol (SNMP).
The community versions can be configured as follows:
SNMP v1/v2:Select the desired option and fill in the SNMP Community field with public or private information.
SNMPv3:
Fill in all the fields below:
SNMP Community
Context name
User
Authentication password
Privacy password
Privacy algorithm: Select one of the options DES or AES-128
Random Authentication: Select one of the options SHA1 or MD5
Minimum authentication level
Select one of the options:
No authentication, no privacy
Authentication, no privacy
Authentication and privacy
To configure the SNMP V3 community, the SNMP data must be configured directly on the printer, which can be done on the device's web page
Example: Lexmark CX860
Configuration path: Settings > Network/ports >SNMP and SNMP version 3
About TLS 1.2
The Lexmark NDD Print Collector module is prepared to operate with TLS 1.2 from version 5.xx onwards.
This is a function integrated into the module, so you only need to activate the protocol in the printer's native functions
Configuration example on the device: Lexmark CX860
Settings > Networks/Ports >TCP/IP and TLS Support
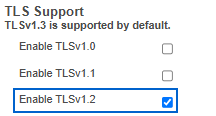
Where the settings are located may change depending on the model.
Next steps
Choose a monitoring configuration method