Configuring the NDD Print Client Canon
In this article, you will learn how to configure the Canon NDD Print Client to use its features:


All configurations are carried out remotely using the ECT (Embedded Configuration Tool).
Configuring Authentication
Authentication Methods
User and password | In this form of authentication, the user must enter their domain credentials. |
|---|---|
PIN and/or Secure PIN | In this form of authentication, the user must enter their PIN code and/or PIN and Secure PIN, configured in NDD Print Portal 360. |
Physical identifier | In this form of authentication, the user must bring their card close to the reader connected to the printer. Self-registration can be enabled so that the user can do it from the device's panel. |
Before you start
Perform the Installation.
Make sure Configure authentication on the NDD Print Host.
Make sure Block the printer's native functions.
Make sure you install the NDD Print Client application.
Open ECT
Select Canon Manufacturer
In the Printer(s) section, fill in the IP address/Hostname of the device to be configured
Click Import file if you want to import a CSV file with the printer addresses for mass configuration.
In the Enabled Modules section, select NDD Print Client
In the NDD Print Client section, fill in the administration password to access the device
In the Local server section, fill in the fields:
SNMP Community: SNMP community configured on the device
NDD Print Host: Server address (IP address or Hostname) where the NDD Print Host component is installed.
Click on Send to printers
Configuring Secure release
Before you start
Perform the Installation.
Make sure Configure authentication on the NDD Print Host.
Make sure Add a printer on the NDD Print Releaser.
Make sure Block the printer's native functions.
Make sure you install the NDD Print Client and NDD Print Client Access applications.
Open ECT
Select Canon Manufacturer
In the Printer(s) section, fill in the IP address/Hostname of the device to be configured
Click Import file if you want to import a CSV file with the printer addresses for mass configuration.
In the Enabled Modules section, select NDD Print Client
In the NDD Print Client section:
Fill in the administration password to access the device
Enable the Releaser setting
In the Local server section, fill in the fields:
SNMP Community: SNMP community configured on the device
NDD Print Host: Server address (IP address or Hostname) where the NDD Print Host component is installed.
NDD Print Releaser: Server address (IP address or Hostname) where the NDD Print Releaser component is installed.
Click on Send to printers
Configuring Controlled Copy
Conditions for blocking copies
When and how users' jobs will be locked:
When the Color and Mono quotas are less than or equal to zero.
When the Color quotas are greater than zero and the Mono quotas are less than or equal to zero.
Limitations
Due to restrictions in the equipment's architecture, it may happen that the user's copy quota is exceeded during the process, resulting in a negative balance.
Before you start
Perform the Installation.
Make sure Configure authentication on NDD Print Host.
Make sure you configure Quotas on NDD Print Portal 360.
Make sure Block the printer's native functions.
Make sure you install the NDD Print Client application.
Open ECT
Select Canon Manufacturer
In the Printer(s) section, fill in the IP address/Hostname of the device to be configured
Click Import file if you want to import a CSV file with the printer addresses for mass configuration.
In the Enabled Modules section, select NDD Print Client
In the NDD Print Client section, fill in the administration password to access the device
In the Local server section, fill in the fields:
SNMP Community: SNMP community configured on the device
NDD Print Host: Server address (IP address or Hostname) where the NDD Print Host component is installed.
Click on Send to printers
Configure Scan to my folder
Before you start
Perform the Installation.
Make sure Configure authentication on NDD Print Host.
Make sure you map the ScanDirectory attribute in the domain sync on the NDD Print Host.
Make sure Block the printer's native functions.
Make sure you install the NDD Print Client application.
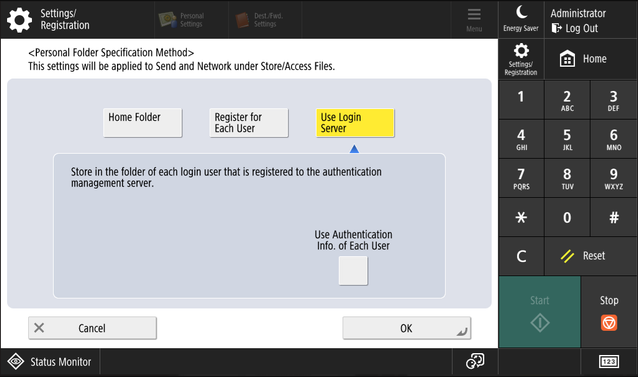
Step 1: Configure the printer
On the printer screen, log in as the Administrator user
Click on Settings/Registration
Go to Device Settings
Click on Function Settings > Common Settings
Click on Personal Folder Specification Method
Select Use Login Server and uncheck the Use Authentication Info. of Each User option
Step 2: Configure the NDD Print Client
Open ECT
Select Canon Manufacturer
In the Printer(s) section, fill in the IP address/Hostname of the device to be configured
Click Import file if you want to import a CSV file with the printer addresses for mass configuration.
In the Enabled Modules section, select NDD Print Client
In the NDD Print Client section:
Fill in the administration password to access the device
Enable the setting Enable default user to scan to folder
Fill in the information of the user who has permission to access the shared folder
Domain
User
Password
In the Local server section, fill in the fields:
SNMP Community: SNMP community configured on the device
NDD Print Host: Server address (IP address or Hostname) where the NDD Print Host component is installed.
Click on Send to printers
Configuring environmental impact
Before you start
Perform the Installation.
Make sure Configure authentication on the NDD Print Host.
Make sure Add a printer on the NDD Print Releaser.
Make sure Block the printer's native functions.
Make sure you install the NDD Print Client and NDD Print Client Access applications.
Open ECT
Select Canon Manufacturer
In the Printer(s) section, fill in the IP address/Hostname of the device to be configured
Click Import file if you want to import a CSV file with the printer addresses for mass configuration.
In the Enabled Modules section, select NDD Print Client
In the NDD Print Client section:
Fill in the administration password to access the device
Enable the Releaser setting and Environment impact
In the Local server section, fill in the fields:
SNMP Community: SNMP community configured on the device
NDD Print Host: Server address (IP address or Hostname) where the NDD Print Host component is installed.
NDD Print Releaser: Server address (IP address or Hostname) where the NDD Print Releaser component is installed.
Click on Send to printers
Common errors
When you send the settings to the NDD Print Client, some errors may be returned.
Click on Save not configured, to save a CSV file with the printers that returned an error.
Error code | Possible causes |
|---|---|
Error #001 |
|
Error #002 |
|
Error #003 |
|
Error #004 |
|
Error #005 |
|
Error #006 |
|
Error #007 |
|
Error #008 |
|
Error #009 |
|
Error #010 |
|